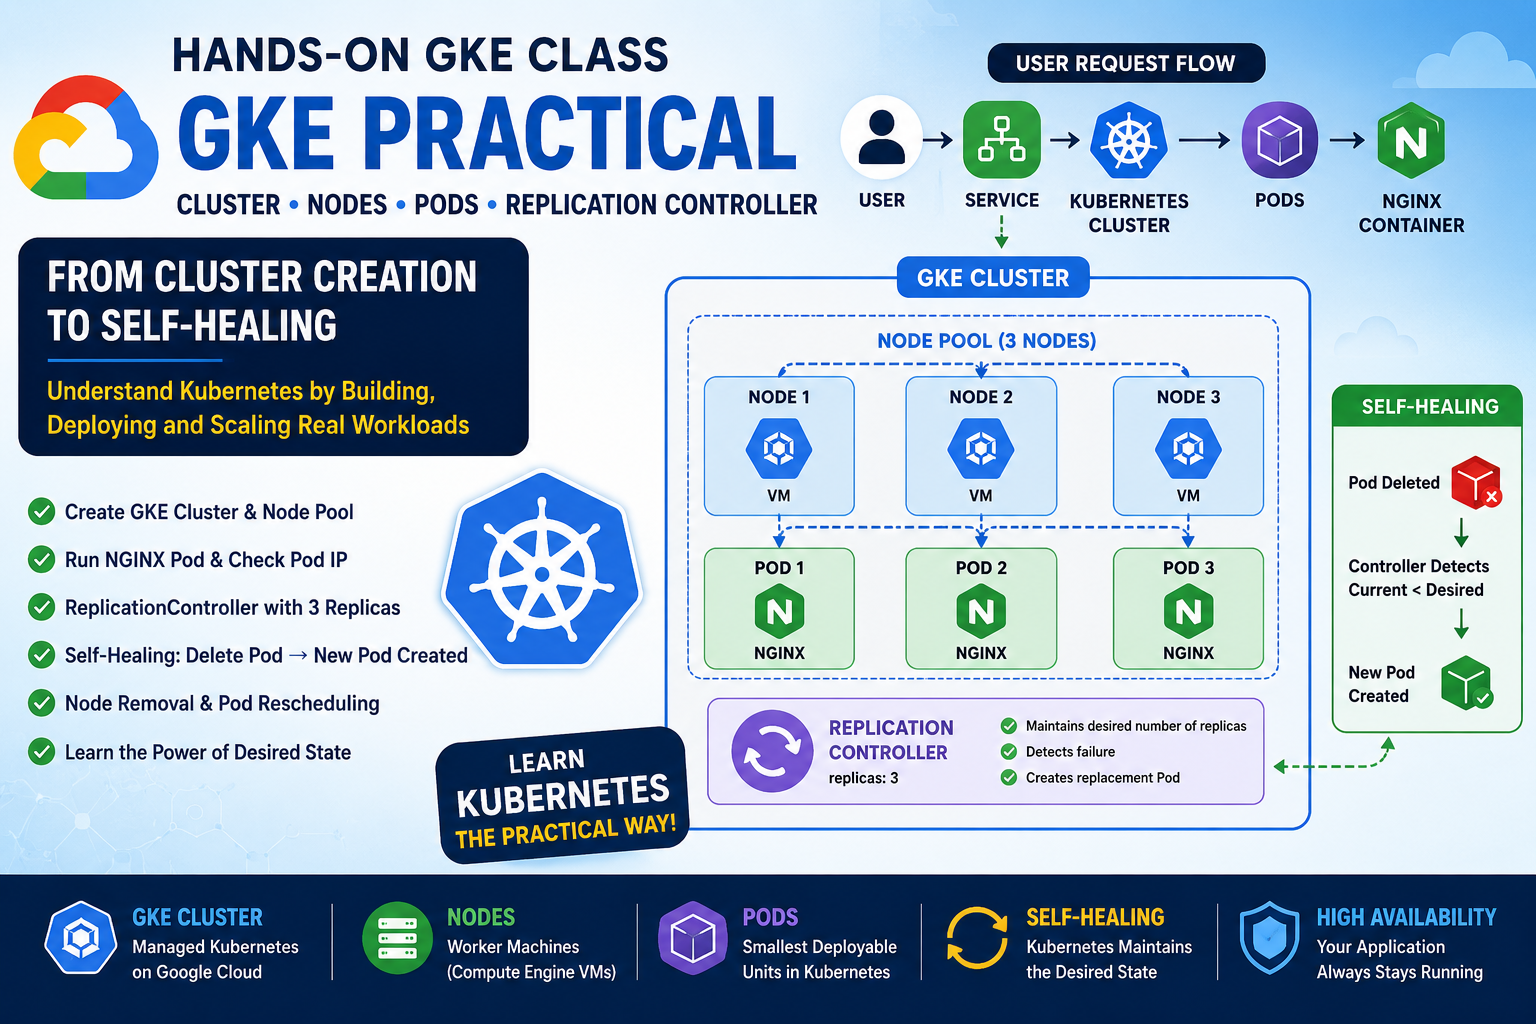
Google Kubernetes Engine (GKE) provides a managed Kubernetes environment on Google Cloud. In this hands-on class, I created a GKE Standard cluster, explored its nodes and underlying Compute Engine VMs, deployed an NGINX Pod, created a ReplicationController, tested self-healing, and finally simulated node removal.
This practical exercise helped me understand an important Kubernetes principle:
Kubernetes continuously works to maintain the desired state of our applications.
1. What is a Kubernetes Cluster?
A Kubernetes cluster is a group of machines that work together to run containerized applications.
Our GKE environment looked like:
                 GKE CLUSTER
                     │
        ┌────────────┼────────────┐
        │            │            │
      Node 1       Node 2       Node 3
        │            │            │
       Pods         Pods         Pods
In GKE Standard, nodes are grouped into node pools. Nodes in a node pool share a common configuration.
Our cluster was:
Cluster Name: cluster-1
Location: us-central1-a
Node Pool: default-pool
Number of Nodes: 3
Machine Type: e2-medium
2. GKE Nodes and Compute Engine VMs
One of the most interesting parts of the lab was seeing the relationship between GKE nodes and Compute Engine virtual machines.
In GKE Standard, the worker nodes are backed by Google Cloud infrastructure. A node pool is essentially a group of similarly configured nodes/VMs.
We could see the machines in:
Google Cloud → Compute Engine → VM instances
For example:
Compute Engine
│
├── gke-cluster-1-default-pool-...-dmhj
├── gke-cluster-1-default-pool-...-h5ng
└── gke-cluster-1-default-pool-...-xwmx
At the Kubernetes level, these machines appear as:
Kubernetes Cluster
│
├── Node ...-dmhj
├── Node ...-h5ng
└── Node ...-xwmx
This helped demonstrate that a Kubernetes Node and the underlying cloud VM are related but are different layers of the system.
3. Connecting kubectl to the GKE Cluster
From Google Cloud Shell, I connected kubectl to my cluster using:
gcloud container clusters get-credentials cluster-1 \
  --zone us-central1-a \
  --project Your_project_ID
Then I verified the nodes:
kubectl get nodesThe result showed three healthy nodes:
NAME                                      STATUS   ROLES
gke-cluster-1-default-pool-...-dmhj      Ready    <none>
gke-cluster-1-default-pool-...-h5ng      Ready    <none>
gke-cluster-1-default-pool-...-xwmx      Ready    <none>
The Ready status means the Kubernetes control plane considers the node available for workloads.
4. Creating Our First NGINX Pod
Next, I created an NGINX Pod:
kubectl run pod1 --image=nginxThen I checked the Pod:
kubectl get podsOutput:
NAME   READY   STATUS    RESTARTS   AGE
pod1   1/1     Running   0          ...
This means the NGINX container was successfully running inside the Pod.
The architecture was:
GKE Cluster
     │
     └── Node
          │
          └── Pod
               │
               └── NGINX container
5. Understanding the Pod IP
I checked the Pod’s IP address:
kubectl get pods -o wideThe Pod received an address similar to:
10.57.128.4This is a private Pod IP.
We tested the NGINX application from a node:
curl http://10.57.128.4The response included:
Welcome to nginx!This proved that the NGINX web server was running successfully.
Important concept
A Pod IP is not normally intended to be a permanent external endpoint.
Pods can be deleted and recreated, and a replacement Pod can receive a different IP.
Therefore, Kubernetes normally uses a Service to provide stable access to applications.
6. Why Do We Create Pods?
A natural question is:
If we cannot normally access a Pod directly from the Internet, why do we create Pods?
The answer is simple:
The Pod is where our application runs.
For example:
Pod
│
└── NGINX container
      │
      └── Web application
A Service is a separate Kubernetes object used to provide a stable network endpoint for Pods.
So:
Pod
↓
Runs the application

Service
↓
Provides stable access to the application
A typical architecture is:
User
 │
 ▼
Service
 │
 ▼
Pod
 │
 ▼
NGINX
7. What Happens If a Pod Dies?
A standalone Pod doesn’t automatically provide the desired level of self-healing.
For example:
Pod 1
  │
  ▼
NGINX
If the Pod is deleted:
Pod 1 ❌the application stops unless something else recreates it.
This is where Kubernetes workload controllers become important.
8. ReplicationController
In the class, we learned about ReplicationController (RC).
A ReplicationController ensures that a specified number of Pod replicas are running. Kubernetes documentation now classifies ReplicationController as a legacy API; modern applications should generally use Deployment, which manages a ReplicaSet.
For learning purposes, we created:
rc.yamlwith:
apiVersion: v1
kind: ReplicationController

metadata:
  name: rc1

spec:
  replicas: 3

  selector:
    app: nginx

  template:
    metadata:
      name: nginx
      labels:
        app: nginx

    spec:
      containers:
      - name: nginx
        image: nginx
        ports:
        - containerPort: 80
9. Understanding replicas: 3
The most important line is:
replicas: 3It tells Kubernetes:
“I want three matching Pods to be running.”
We applied the configuration:
kubectl apply -f rc.yamlThen:
kubectl get rcThe result was:
NAME   DESIRED   CURRENT   READY
rc1    3         3         3
This means:
Desired = 3
Current = 3
Ready   = 3
Everything was healthy.
10. Three NGINX Pods
We checked:
kubectl get podsand received three Pods:
rc1-4fkfz   1/1   Running
rc1-r8rgz   1/1   Running
rc1-v1klj   1/1   Running
Using:
kubectl get pods -o widewe could also see the IP addresses and nodes.
The Pods were distributed across the three GKE nodes:
                 GKE CLUSTER

       ┌─────────────┼─────────────┐
       │             │             │
     Node 1        Node 2        Node 3
       │             │             │
       ▼             ▼             ▼
    nginx Pod     nginx Pod     nginx Pod
This demonstrated how Kubernetes schedules Pods onto available nodes.
11. Testing Self-Healing
Now came one of the most important experiments.
I deleted one of the Pods:
kubectl delete pod rc1-4fkfzKubernetes confirmed:
pod "rc1-4fkfz" deletedThen I checked:
kubectl get pods -o wideThe deleted Pod was gone.
But another Pod with a new name appeared:
rc1-m5tdvFor example:
rc1-m5tdv   1/1   Running
rc1-r8rgz   1/1   Running
rc1-v1klj   1/1   Running
The important observation was:
Old Pod:
rc1-4fkfz
IP: 10.57.128.5

New Pod:
rc1-m5tdv
IP: 10.57.128.6
The Pod name and IP changed.
But the number of replicas returned to 3.
12. How ReplicationController Performs Self-Healing
This is the basic mechanism:
             ReplicationController
                      │
                Desired = 3
                      │
          ┌───────────┼───────────┐
          ▼           ▼           ▼
        Pod 1       Pod 2       Pod 3
          │           │           │
         ✅           ✅           ✅
Delete one:
        Pod 1 ❌
        Pod 2 ✅
        Pod 3 ✅
Now:
Desired = 3
Current = 2
The controller detects the difference.
It creates a replacement:
        Pod 2 ✅
        Pod 3 ✅
        Pod 4 ✅
Therefore:
Desired = 3
Current = 3
Ready   = 3
This is the basic idea of self-healing.
13. What If an Entire Node Is Removed?
Next, we performed a more advanced experiment.
One of the nodes was:
gke-cluster-1-default-pool-956d19d3-xwmxWe removed the Kubernetes Node object using:
kubectl delete node gke-cluster-1-default-pool-956d19d3-xwmxAfter checking:
kubectl get nodesonly two Kubernetes Nodes were visible.
However, the underlying Compute Engine VM was still visible in the Google Cloud console.
This demonstrated an important distinction:
Google Cloud infrastructure
        │
        ▼
Compute Engine VM
        │
        ▼
GKE Node
        │
        ▼
Kubernetes workloads
Deleting a Kubernetes Node object is not the same operation as properly resizing or deleting a GKE node pool. GKE Standard node pools are the supported mechanism for managing groups of nodes and can be resized through GKE.
14. What Happened to the Pods?
Before the node removal, we had:
Node 1 → Pod 1
Node 2 → Pod 2
Node 3 → Pod 3
After removing Node 3:
Node 1 → Pod 1
Node 2 → Pod 2
Node 3 → ❌
The ReplicationController still required:
replicas: 3A replacement Pod was created and scheduled onto an available node.
The final situation became:
Node 1
 └── Pod

Node 2
 ├── Pod
 └── Pod
So we had:
2 Nodes
3 Pods
The application replicas were still maintained.
15. Very Important: Pod vs Node vs VM
This practical exercise made the difference between these three concepts much clearer.
Pod
The Pod runs the application.
Pod
 └── NGINX
Node
The Node provides compute resources for Pods.
Node
 └── Pods
VM
In GKE Standard, the node is backed by Google Cloud infrastructure.
Compute Engine VM
       │
       ▼
     GKE Node
       │
       ▼
      Pods
16. Desired State Is the Heart of Kubernetes
The most important lesson from this class is the concept of desired state.
We said:
replicas: 3Kubernetes continuously tries to make reality match that desired state.
Desired State
     │
     ▼
3 Pods
     │
     │ compare
     ▼
Actual State
     │
     ▼
2 Pods
     │
     ▼
Controller creates 1 Pod
     │
     ▼
3 Pods
This reconciliation model is fundamental to Kubernetes.
17. Why Modern Kubernetes Uses Deployment
Although ReplicationController was useful for learning the basic concept of replication, it is now considered a legacy API.
Kubernetes recommends using:
Deployment
    │
    ▼
ReplicaSet
    │
    ├── Pod
    ├── Pod
    └── Pod
instead of:
ReplicationController
    │
    ├── Pod
    ├── Pod
    └── Pod
The official Kubernetes documentation identifies Deployment + ReplicaSet as the recommended modern approach.
So the practical knowledge from this exercise remains valuable because it explains why controllers exist, even though we normally use Deployments in modern Kubernetes.
18. Useful Commands From This Lab
Check cluster nodes
kubectl get nodesDetailed node information
kubectl get nodes -o wideList Pods
kubectl get podsList Pods with node and IP information
kubectl get pods -o wideCreate an NGINX Pod
kubectl run pod1 --image=nginxDelete a Pod
kubectl delete pod pod1Create a ReplicationController
kubectl apply -f rc.yamlCheck ReplicationControllers
kubectl get rcDelete a Kubernetes Node object
kubectl delete node NODE_NAMENote: In GKE, use GKE node-pool operations when you actually intend to add/remove infrastructure rather than manually deleting a Kubernetes Node object. GKE provides supported node-pool resize and management operations.
19. Final Architecture
After completing the lab, the overall architecture can be visualized as:
                         GOOGLE CLOUD
                              │
                              ▼
                       GKE CLUSTER
                              │
                         Node Pool
                              │
                 ┌────────────┼────────────┐
                 │            │            │
              Node 1       Node 2       Node 3
                 │            │            │
                Pod          Pod          Pod
                 │            │            │
               NGINX        NGINX        NGINX
The controller adds another layer:
                       Deployment
                           │
                      ReplicaSet
                           │
              ┌────────────┼────────────┐
              ▼            ▼            ▼
            Pod 1        Pod 2        Pod 3
              │            │            │
            NGINX        NGINX        NGINX
And network access is normally provided through a Service:
                    User
                     │
                     ▼
                  Service
                     │
          ┌──────────┼──────────┐
          ▼          ▼          ▼
        Pod 1      Pod 2      Pod 3
          │          │          │
        NGINX      NGINX      NGINX
Conclusion
This GKE practical class provided a strong foundation for understanding Kubernetes.
We started with a GKE cluster, examined its nodes and Compute Engine VMs, created an NGINX Pod, explored Pod IP addresses, created a ReplicationController with three replicas, and tested Kubernetes’ self-healing behavior by deleting Pods.
We then went one step further by removing a Kubernetes Node object and observing how the workload could continue running on the remaining nodes.
The most important lessons are:
- Cluster → The overall Kubernetes environment.
- Node → A worker machine that runs Pods.
- Pod → The Kubernetes unit that runs containers.
- Pod IP → A private address associated with a Pod and not a stable application endpoint.
- ReplicationController → Maintains the desired number of Pod replicas.
- Self-healing → Controllers recreate missing Pods.
- Node failure/removal → Kubernetes can reschedule workloads when suitable capacity exists.
- Service → Provides stable networking for Pods.
- Deployment + ReplicaSet → The modern recommended approach for managing replicated applications.
- GKE Node Pool → The proper GKE mechanism for managing groups of worker nodes.
This hands-on exercise makes the core Kubernetes idea much easier to understand:
Kubernetes does not simply run containers—it continuously compares the actual state with the desired state and takes action to bring the system back to the desired state.
Official references: Google Cloud — GKE Node Pools · Google Cloud — Add and Manage Node Pools · Kubernetes — ReplicationController