Kubernetes applications often need persistent storage to keep data even when containers restart or are recreated. Kubernetes provides Persistent Volumes (PV) and Persistent Volume Claims (PVC) to manage this storage.
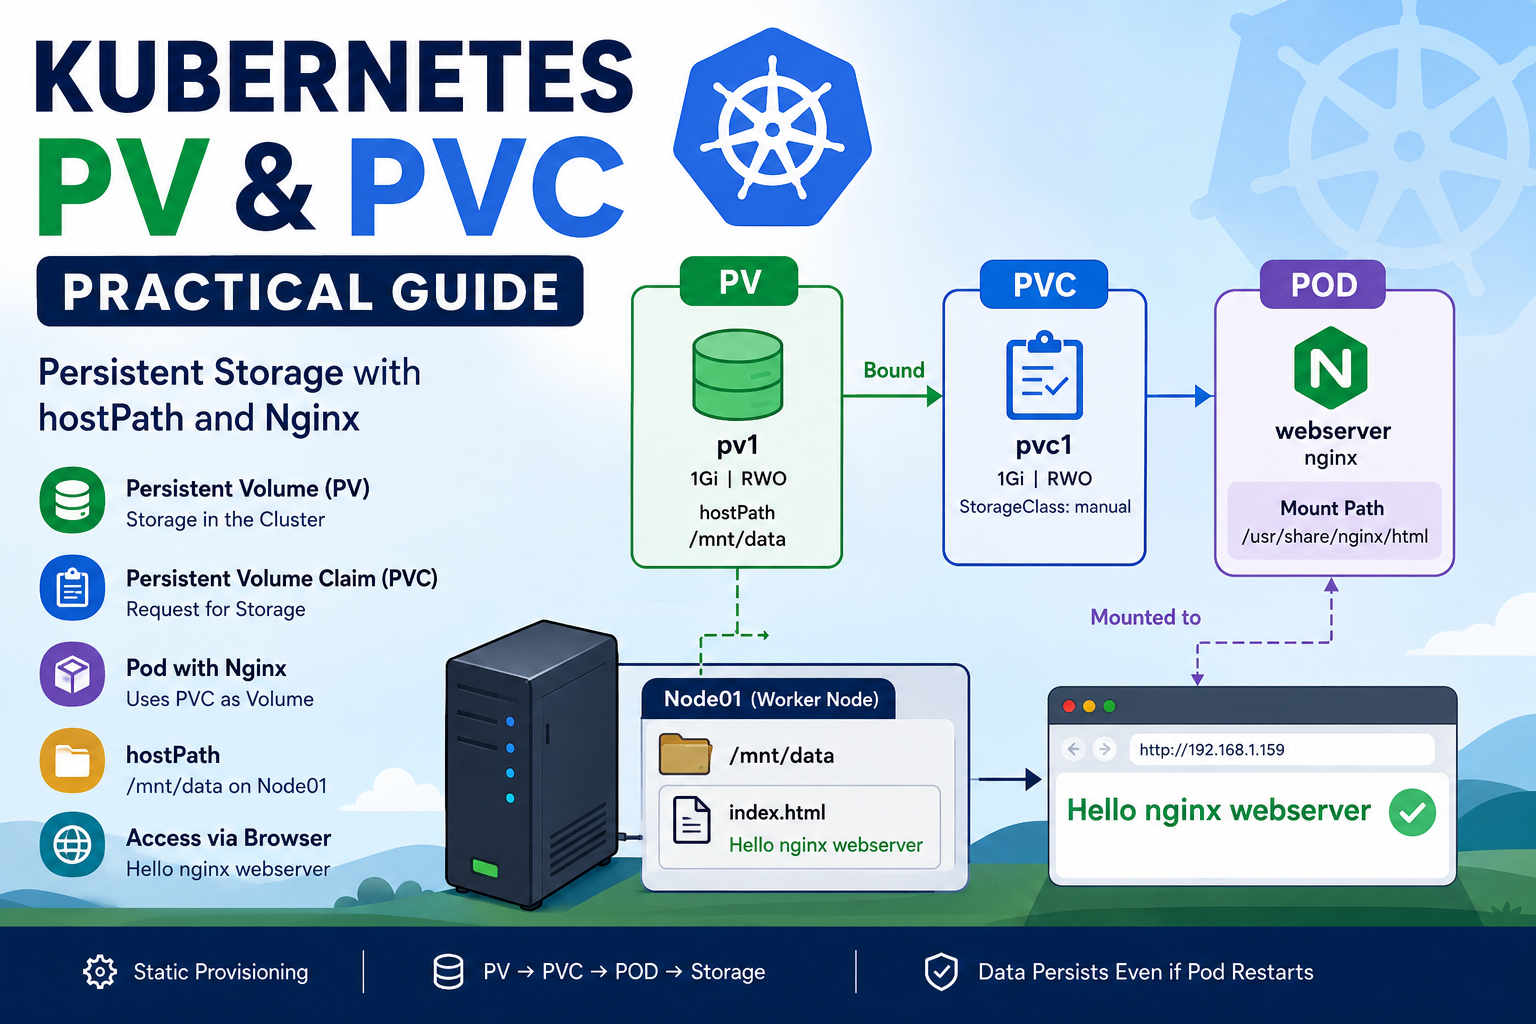
In this practical lab, we will create a PersistentVolume, create a PersistentVolumeClaim, attach the PVC to an Nginx Pod, and use a node’s /mnt/data directory as persistent storage through hostPath.
What You Will Learn
In this practical, we will understand:
- What a Persistent Volume (PV) is
- What a Persistent Volume Claim (PVC) is
- How PV and PVC are connected
- How to create a PV manually
- How to create a PVC
- How to attach a PVC to a Pod
- How
hostPathworks - How Nginx uses persistent storage
- How data written on the Kubernetes node becomes available inside the Pod
1. PV and PVC Architecture
The basic architecture of our lab is:
                Kubernetes Cluster
                       │
                       │
              ┌────────▼────────┐
              │       PV        │
              │      pv1         │
              │      1Gi         │
              │   hostPath      │
              │   /mnt/data     │
              └────────┬────────┘
                       │
                    Bound
                       │
              ┌────────▼────────┐
              │       PVC       │
              │      pvc1       │
              │      1Gi        │
              └────────┬────────┘
                       │
                       │ claimName: pvc1
                       ▼
              ┌─────────────────┐
              │       Pod       │
              │    webserver    │
              │                 │
              │     Nginx       │
              │                 │
              │ /usr/share/     │
              │ nginx/html      │
              └────────┬────────┘
                       │
                       ▼
                  index.html
                       │
                       ▼
              Hello nginx webserver
The important relationship is:
Pod → PVC → PV → Actual Storage
2. What is a Persistent Volume?
A PersistentVolume (PV) is a storage resource in a Kubernetes cluster.
Unlike a normal container filesystem, data stored on a PV can persist beyond the lifecycle of a container.
A PV is a cluster-level resource, meaning it does not belong to a particular namespace.
In our example, we create a PV named pv1 with:
- Capacity:
1Gi - Access mode:
ReadWriteOnce - Storage class:
manual - Storage type:
hostPath - Path:
/mnt/data
3. Creating the Persistent Volume
First, check the available nodes:
kubectl get nodesCreate the PV configuration:
vim pv.yamlAdd the following configuration:
apiVersion: v1
kind: PersistentVolume
metadata:
  name: pv1
spec:
  storageClassName: manual
  capacity:
    storage: 1Gi
  accessModes:
    - ReadWriteOnce
  hostPath:
    path: "/mnt/data"
Apply the configuration:
kubectl apply -f pv.yamlCheck the PV:
kubectl get pvYou should see a PV named:
pv1with approximately:
Capacity:       1Gi
Access Modes:   RWO
StorageClass:   manual
4. Understanding hostPath
The following section is particularly important:
hostPath:
  path: "/mnt/data"
hostPath tells Kubernetes to use a directory from the filesystem of the node where the Pod is running.
In our example:
Node01
   │
   └── /mnt/data
          │
          └── index.html
This directory will ultimately be available inside the Nginx container at:
/usr/share/nginx/htmlSo we have:
Node01
/mnt/data
    │
    │ hostPath
    ▼
PV pv1
    │
    ▼
PVC pvc1
    │
    ▼
Nginx Pod
    │
    ▼
/usr/share/nginx/html
5. Creating the Persistent Volume Claim
A PersistentVolumeClaim (PVC) is a request for storage.
The user or application doesn’t normally need to know all the details of the underlying storage. Instead, it requests the amount and type of storage it needs.
Create the PVC:
vim pvc.yamlAdd:
apiVersion: v1
kind: PersistentVolumeClaim
metadata:
  name: pvc1
spec:
  storageClassName: manual
  accessModes:
    - ReadWriteOnce
  resources:
    requests:
      storage: 1Gi
Apply it:
kubectl apply -f pvc.yamlCheck the PVC:
kubectl get pvcThen check the PV:
kubectl get pvThe PVC should become:
STATUS: BoundThis means Kubernetes successfully matched the PVC with a suitable PV.
The relationship is:
PVC pvc1
    │
    │ Bound
    ▼
PV pv1
6. Understanding PV and PVC Binding
Our PV provides:
1Gi
ReadWriteOnce
StorageClass: manual
Our PVC requests:
1Gi
ReadWriteOnce
StorageClass: manual
Because the requirements match, Kubernetes can bind them.
        PV
       pv1
       1Gi
        ▲
        │
       Bound
        │
        ▼
       PVC
      pvc1
      1Gi
This is one of the most important concepts to understand when working with Kubernetes storage.
7. Creating the Nginx Pod
Now we need an application that will use the PVC.
Create:
vim pod1.yamlUse:
apiVersion: v1
kind: Pod
metadata:
  name: webserver
spec:
  volumes:
    - name: vol1
      persistentVolumeClaim:
        claimName: pvc1

  containers:
    - name: nginx
      image: nginx
      volumeMounts:
        - mountPath: "/usr/share/nginx/html"
          name: vol1
Apply the Pod:
kubectl apply -f pod1.yamlCheck:
kubectl get podsYou should see:
webserverin the Running state.
8. Understanding the Pod Configuration
There are two important sections in the Pod configuration.
Volume
volumes:
  - name: vol1
    persistentVolumeClaim:
      claimName: pvc1
This tells Kubernetes:
Use the PVC named
pvc1as a volume for this Pod.
Then we mount that volume into the container:
volumeMounts:
  - mountPath: "/usr/share/nginx/html"
    name: vol1
This tells Kubernetes:
Mount
vol1inside the Nginx container at/usr/share/nginx/html.
Therefore:
PVC pvc1
    │
    ▼
Volume vol1
    │
    ▼
/usr/share/nginx/html
9. Checking the Nginx Storage
We can enter the Pod:
kubectl exec -it webserver -- bashThen check:
ls -l /usr/share/nginx/html/Initially, the directory may be empty because we haven’t created an index.html file in /mnt/data yet.
Exit the container:
exit10. Checking the Node Storage
Now connect to the worker node:
ssh node01Switch to root if required:
sudo -iCheck the directory:
ls -l /mnt/Then:
ls -l /mnt/data/Now create an HTML file:
echo "Hello nginx" > /mnt/data/index.htmlCheck the file:
ls -l /mnt/data/You should now have:
/mnt/data/index.htmlwith the content:
Hello nginx11. Accessing the File from the Nginx Pod
Return to the control plane:
exitThen:
exitNow enter the Pod again:
kubectl exec -it webserver -- bashCheck:
ls -l /usr/share/nginx/html/You should now see:
index.htmlThe important thing is that we created the file on:
/mnt/data/index.htmlbut it is visible inside the container as:
/usr/share/nginx/html/index.htmlThis happens because of the PV/PVC and volume mount configuration.
12. Accessing Nginx Using curl
Now exit the Pod:
exitFrom the control plane, run:
curl http://192.168.1.159The response is:
Hello nginxWhy?
Nginx looks for:
/usr/share/nginx/html/index.htmlOur mounted storage contains:
index.htmlwith:
Hello nginxTherefore Nginx returns that content through HTTP.
13. Updating the Persistent Data
Now let’s demonstrate why the storage is useful.
Connect to node01 again:
ssh node01Change the contents of the file:
echo "Hello nginx webserver" > /mnt/data/index.htmlNow return to the control plane and run:
curl http://192.168.1.159The result will be:
Hello nginx webserverNotice that we didn’t modify the Nginx container.
We modified the file in:
/mnt/data/index.htmland Nginx immediately served the updated content.
14. Complete Data Flow
The complete flow of this practical is:
                 KUBERNETES CLUSTER
                         │
                         ▼
                 PersistentVolume
                      pv1
                       │
                 Capacity: 1Gi
                 Access: RWO
                 StorageClass: manual
                       │
                 hostPath /mnt/data
                       │
                       ▼
                 PersistentVolumeClaim
                      pvc1
                       │
                       │ Bound
                       ▼
                    Pod
                  webserver
                       │
                    nginx
                       │
                volumeMount
                       │
                       ▼
          /usr/share/nginx/html
                       │
                       ▼
                  index.html
                       │
                       ▼
              "Hello nginx webserver"
                       │
                       ▼
             curl 192.168.1.159
15. Static Provisioning
This practical demonstrates Static Provisioning.
Why?
Because we manually created the PV:
kubectl apply -f pv.yamlbefore creating the PVC.
The process is:
Administrator
      │
      │ manually creates
      ▼
     PV
      │
      │ PVC requests storage
      ▼
     PVC
      │
      ▼
     Pod
      │
      ▼
   Application
Therefore:
Static Provisioning = Administrator manually creates the PersistentVolume.
16. PV vs PVC
| Feature | PersistentVolume (PV) | PersistentVolumeClaim (PVC) |
|---|---|---|
| Purpose | Provides storage | Requests storage |
| Scope | Cluster-wide | Namespace-specific |
| Created by | Usually administrator/system | User/application |
| Example | pv1 | pvc1 |
| Storage | 1Gi | Requests 1Gi |
| Access Mode | ReadWriteOnce | Requests ReadWriteOnce |
| Our storage | /mnt/data | Requests PV storage |
A simple way to remember:
PV = Storage
PVC = Request for Storage
17. Why Do We Use PVC?
A Pod generally should not have to know the details of the underlying storage.
For example, the application only needs:
"I need 1Gi of persistent storage."The PVC represents that requirement.
Kubernetes then connects the PVC to an appropriate PV.
This creates a useful separation:
Application
     │
     ▼
    PVC
     │
     ▼
    PV
     │
     ▼
Storage
18. Important Note About hostPath
Our lab uses:
hostPath:
  path: "/mnt/data"
This is excellent for learning how PV, PVC, and Pod storage work.
However, hostPath has an important limitation.
The storage is associated with the local filesystem of a particular node.
For example:
Node01
  └── /mnt/data
and:
Node02
  └── /mnt/data
are normally two different directories.
Therefore, if a Pod moves from Node01 to Node02, it may not see the same data.
For production environments, Kubernetes commonly uses storage solutions based on CSI drivers and external storage systems, such as cloud disks, network filesystems, or distributed storage.
19. Commands Used in This Practical
Here is a consolidated list of the important commands:
kubectl get nodes

vim pv.yaml

kubectl apply -f pv.yaml

kubectl get pv

vim pvc.yaml

kubectl apply -f pvc.yaml

kubectl get pvc

kubectl get pv

vim pod1.yaml

kubectl apply -f pod1.yaml

kubectl get pods

kubectl exec -it webserver -- bash

ls -l /usr/share/nginx/html/

ssh node01

sudo -i

ls -l /mnt/

ls -l /mnt/data/

echo "Hello nginx" > /mnt/data/index.html

ls -l /mnt/data/

kubectl exec -it webserver -- bash

ls -l /usr/share/nginx/html/

curl http://192.168.1.159

ssh node01

echo "Hello nginx webserver" > /mnt/data/index.html

curl http://192.168.1.159
20. Final Result
We successfully created the following architecture:
        PV: pv1
          │
          │ 1Gi
          ▼
        PVC: pvc1
          │
          ▼
     Pod: webserver
          │
          ▼
    Container: nginx
          │
          ▼
/usr/share/nginx/html
          │
          ▼
      index.html
          ▲
          │
          │ hostPath
          │
     /mnt/data
       Node01
When we execute:
echo "Hello nginx webserver" > /mnt/data/index.htmlthe Nginx application can serve the same content:
curl http://192.168.1.159Output:
Hello nginx webserverConclusion
Persistent Volumes and Persistent Volume Claims are fundamental concepts for managing storage in Kubernetes.
In this hands-on example, we manually created a 1Gi PersistentVolume (pv1) using hostPath, created a PersistentVolumeClaim (pvc1), and attached the PVC to an Nginx Pod (webserver). The Nginx container mounted the storage at /usr/share/nginx/html, while the underlying hostPath was /mnt/data on the worker node.
The most important concept to remember is:
Pod
 ↓
PVC
 ↓
PV
 ↓
Storage
And for this particular lab:
webserver
   ↓
pvc1
   ↓
pv1
   ↓
/mnt/data on Node01
   ↓
/usr/share/nginx/html in Nginx
   ↓
index.html
This practical demonstrates Static Provisioning with a hostPath-based PersistentVolume in Kubernetes.