How to Create ELB in AWS with EC2 Instances in Different Availability Zones (Step-by-Step Guide)
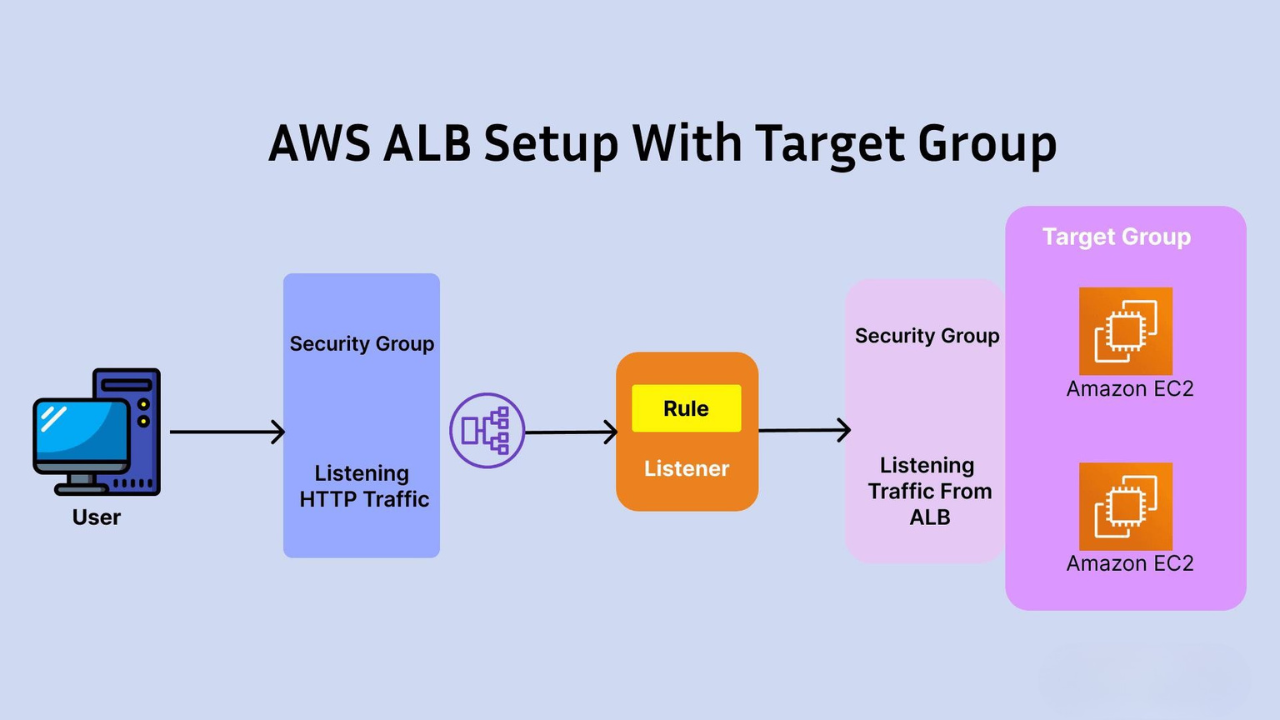
Flow:
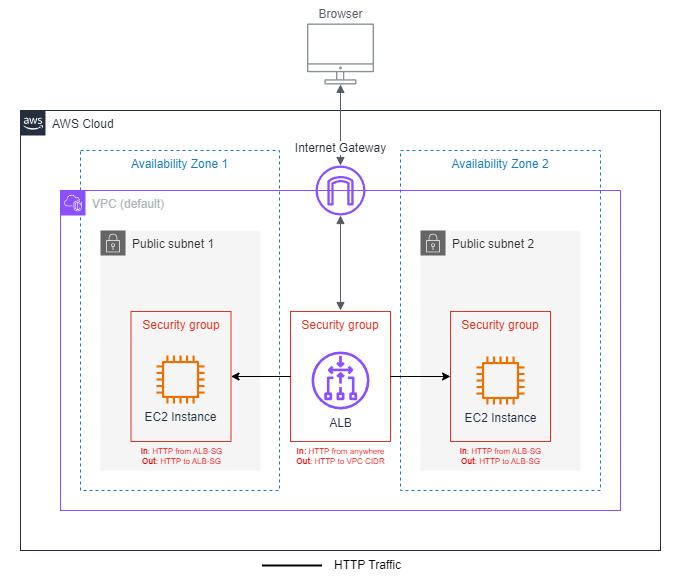
User → ELB (ALB Listener) → Target Group → EC2 Instances (in different AZs)
📌 Introduction
In this guide, you will learn how to:
- Launch 2 EC2 instances in different Availability Zones
- Create a Target Group
- Configure an Application Load Balancer (ELB)
- Distribute traffic for high availability
We will use:
- Amazon EC2
- Elastic Load Balancing
🔹 Step 1: Launch EC2 Instances (in Different AZs)
🛠️ Create First Instance (AZ-1)
- Go to EC2 Dashboard → Launch Instance
- Name:
web-server-1 - AMI: Amazon Linux
- Instance type: t2.micro
- Select Availability Zone (e.g., ap-south-1a)
- Security Group:
- Allow HTTP (80)
- Allow SSH (22)
👉 User Data:
#!/bin/bash
yum update -y
yum install -y httpd
systemctl enable httpd
systemctl start httpd
echo "Server 1 - AZ1 Working" > /var/www/html/index.html
🛠️ Create Second Instance (AZ-2)
Repeat same steps:
- Name:
web-server-2 - Availability Zone: ap-south-1b
👉 User Data:
#!/bin/bash
yum update -y
yum install -y httpd
systemctl enable httpd
systemctl start httpd
echo "Elb and auto scalling second server working " > /var/www/html/index.html
🔹 Step 2: Create Target Group
- Go to EC2 → Target Groups
- Click Create Target Group
⚙️ Configuration:
- Target type: Instances
- Name:
my-target-group - Protocol: HTTP
- Port: 80
- VPC: Select your VPC
👉 Health Check:
- Path:
/ - Protocol: HTTP
👉 Register Targets:
- Select both instances (
web-server-1,web-server-2) - Click Include as pending
- Click Create Target Group
🔹 Step 3: Create Application Load Balancer (ELB)
- Go to EC2 → Load Balancers
- Click Create Load Balancer
- Choose: Application Load Balancer
⚙️ Basic Settings:
- Name:
my-alb - Scheme: Internet-facing
- IP type: IPv4
⚙️ Network Mapping:
- Select at least 2 subnets (different AZs)
⚙️ Security Group:
- Allow HTTP (Port 80)
⚙️ Listener:
- Protocol: HTTP
- Port: 80
⚙️ Routing:
- Select existing Target Group:
my-target-group
👉 Click Create Load Balancer
🔹 Step 4: Verify Health Check
- Go to Target Group → Targets
- Status should be: Healthy ✅
👉 If not:
- Check Apache is running
- Check port 80 open
🔹 Step 5: Test Load Balancer
- Copy Load Balancer DNS
- Paste in browser
👉 Output will switch between:
Server 1 - AZ1 WorkingServer 2 - AZ2 Working
👉 This confirms:
✅ Load balancing working
✅ Multi-AZ setup working

Total Page Visits: 10338 - Today Page Visits: 8