🚀 Managing Containers Using Docker 🐳
A Beginner-Friendly Guide to Docker Containers on AWS EC2
In today’s cloud-native world, Docker Containers have completely changed the way applications are developed, deployed, and managed. Containers are lightweight, fast, portable, and incredibly efficient compared to traditional virtual machines.
In this blog, we will learn:
✨ What Docker is
✨ Important Container Terminologies
✨ How to Install Docker on AWS EC2
✨ How to Run and Manage Containers
✨ How to Launch an NGINX Web Server using Docker
✨ How to Expose Applications to the Internet
Let’s dive in! 🔥
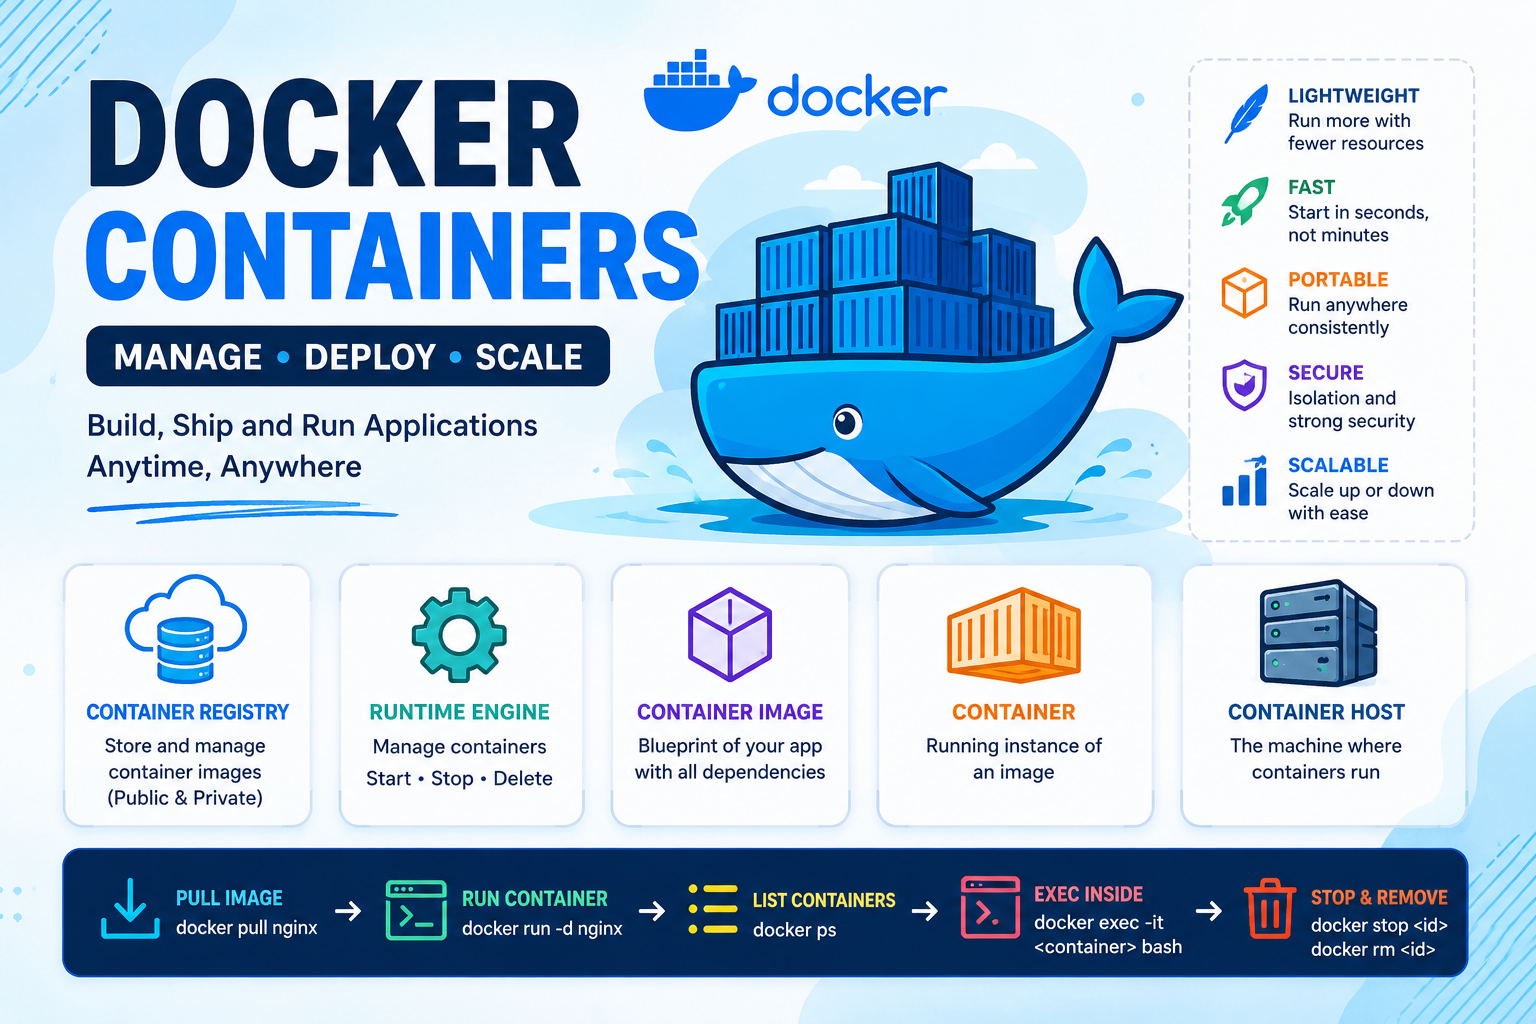
📦 What is Docker?
Docker is a powerful Containerization Platform that allows developers to package applications along with all dependencies into lightweight containers.
Containers ensure that applications run consistently across:
- Development
- Testing
- Production
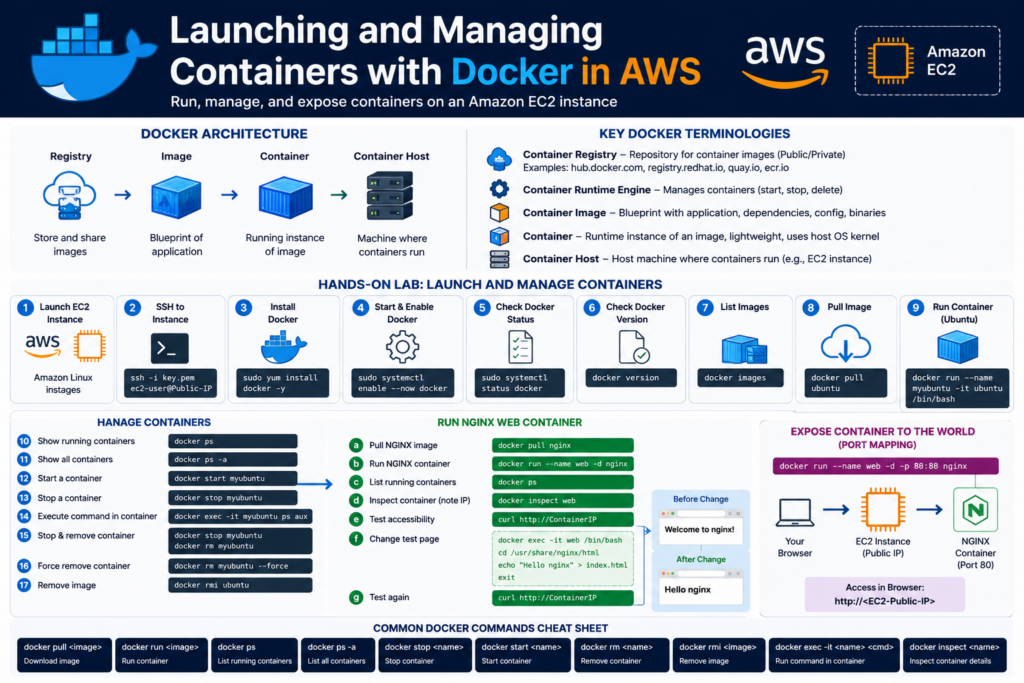
🧠 Important Container Terminologies
🌐 1. Container Registry
A Container Registry is a repository where container images are stored.
There are two types:
- 🌍 Public Registry
- 🔒 Private Registry
Popular Registries:
⚙️ 2. Container Runtime Engine
The Container Runtime Engine manages containers.
It performs operations like:
✅ Start
✅ Stop
✅ Delete
✅ Run Containers
Example:
Docker Engine
🖼️ 3. Container Image
A Container Image acts as a blueprint for containers.
It contains:
- Application Code
- Libraries
- Dependencies
- Configuration Files
- Binary Files
📦 4. Container
A Container is a running instance of a Container Image.
Key Features:
✨ Lightweight
✨ Fast
✨ Portable
✨ No separate Operating System required
Containers share the kernel of the Host OS.
🖥️ 5. Container Host
The machine where containers run is called the Container Host.
Example:
AWS EC2 Instance
☁️ Docker Lab — Launching Containers on AWS EC2
🚀 Step 1 — Launch an EC2 Instance
Go to AWS Console → EC2 → Launch Instance
Choose:
✅ Amazon Linux Instance
🔐 Step 2 — Connect to EC2 using SSH
Open Terminal and run:
ssh -i key.pem ec2-user@Public-IP
Replace:
key.pem→ Your Key PairPublic-IP→ Your EC2 Public IP
📥 Step 3 — Install Docker
Run the following command:
sudo yum install docker -y
What happens?
Docker package gets installed on the EC2 instance.
▶️ Step 4 — Start Docker Service
sudo systemctl enable --now docker
What this does:
✅ Starts Docker Service
✅ Enables Auto Start during reboot
✅ Step 5 — Verify Docker Status
sudo systemctl status docker
If you see:
active (running)
Docker is running successfully 🎉
🔎 Step 6 — Check Docker Version
docker version
This displays:
- Docker Client Version
- Docker Server Version
🖼️ Step 7 — View Available Images
docker images
Initially, no images will be available.
📥 Step 8 — Pull Ubuntu Image
docker pull ubuntu
What happens?
Docker downloads the Ubuntu image from Docker Hub.
🚀 Step 9 — Run a Container
docker run --name myubuntu -it ubuntu /bin/bash
🧠 Command Breakdown
| Option | Meaning |
|---|---|
| –name | Assign Container Name |
| -i | Interactive Mode |
| -t | Terminal Access |
| ubuntu | Image Name |
| /bin/bash | Open Bash Shell |
📋 Step 10 — View Running Containers
docker ps
📦 Step 11 — View All Containers
docker ps -a
This shows:
✅ Running Containers
✅ Stopped Containers
▶️ Step 12 — Start a Container
docker start myubuntu
⏹️ Step 13 — Stop a Container
docker stop myubuntu
⚡ Step 14 — Execute Commands Inside Container
docker exec -it myubuntu ps aux
This displays running processes inside the container.
🗑️ Step 15 — Delete a Container
First stop the container:
docker stop myubuntu
Then remove it:
docker rm myubuntu
💥 Step 16 — Force Delete a Container
docker rm myubuntu --force
🧹 Step 17 — Delete an Image
docker rmi ubuntu
🌐 Launching an NGINX Web Server Container
Now let’s deploy a real web server using Docker! 🔥
📥 Step 18a — Pull NGINX Image
docker pull nginx
🚀 Step 18b — Run NGINX Container
docker run --name web -d nginx
What does -d mean?
Runs the container in Detached Mode (Background).
📋 Step 18c — Check Running Containers
docker ps
🔍 Step 18d — Inspect Container Details
docker inspect web
Note:
Find the Container IP Address.
🌐 Step 18e — Test NGINX Web Server
curl http://ContainerIP
You should see the default NGINX page.
✏️ Step 18f — Modify NGINX Web Page
Access the container:
docker exec -it web /bin/bash
Navigate to the document root:
cd /usr/share/nginx/html
Modify the index page:
echo "Hello nginx" > index.html
Exit the container:
exit
🌍 Step 18g — Test Again
curl http://ContainerIP
Now the output will be:
Hello nginx
🎉 Congratulations!
You just customized a live containerized web server.
🌎 Step 19 — Expose Container to the External World
Use Port Mapping:
docker run --name web -d -p 80:80 nginx
🔌 Port Mapping Explained
| Host Port | Container Port |
|---|---|
| 80 | 80 |
🌐 Access from Browser
Open:
http://EC2-Public-IP
You will see the NGINX Web Page in your browser 🚀
📚 Essential Docker Commands Summary
| Command | Description |
|---|---|
| docker images | List Images |
| docker ps | Running Containers |
| docker ps -a | All Containers |
| docker pull | Download Image |
| docker run | Run Container |
| docker stop | Stop Container |
| docker start | Start Container |
| docker rm | Remove Container |
| docker rmi | Remove Image |
| docker exec | Execute Inside Container |
| docker inspect | Container Details |
🎯 Final Thoughts
Docker has become one of the most essential tools in modern DevOps and Cloud Computing.
With Docker Containers you can:
✅ Deploy Faster
✅ Scale Easily
✅ Reduce Infrastructure Costs
✅ Ensure Application Consistency
Learning Docker is the first big step toward:
- Kubernetes
- DevOps
- Cloud Native Applications
- Microservices Architecture
Happy Learning & Happy Containerizing! 🐳🔥